Wednesday, December 11, 2013

Restaurant Review: Don Antonio's by Starita

Warning: This review might become the most honest post I've ever written. I first went to Don Antonio's by Starita with a friend after work for dinner and drinks. She had researched her neighborhood and knew this had plenty of gluten free options for me. It sounded like the perfect place or both of us.

In addition to our cocktails we started with burrata mozzarella.  I was offered gluten free bread to go along with it. The bread was awful. Like, so bad you'd rather chomp on tree bark over this stuff. It was so dense and flavorless. I hated it and didn't take another bite. I still cringe thinking about it. Yuck.

When the burrata came my mind was blown (in a really great way!) It was the largest ball of mozzarella I have ever seen! And when we cut that baby open, tons of gooey mozzarella goodness came poring out. I was in cheese heaven! (What other kind of heaven is there anyway?) They paired it with wonderful prosciutto, balsamic glaze, olive oil and two small tomatoes. It was very delicious.


Next, we placed our order off of their gluten free pizza portion of the menu. I asked a few questions to ensure proper food handling as well. We settled on the Margherita with Salami Gluten Free Pizza. While ordering, the women next to us over heard and when they placed their order they decided to try the gluten free pie as well (not for allergy issues.)

Our pie came out first and looked amazing. You would have no idea it was gluten free. The crust was thin, bubbly and tasted perfect. My friend and I literally kept talking about it... Until the pizza came to the table next to us. And looked like a cracker!!!!!!!! I was poisoned!! I immediately freaked out. I definitely frightened the people next to me by interrogating them to ensure they too ordered g-free. I called my server and the owner over. Boy was that fun. They too were scared. The owner literally stood in the corner listening not saying a word while the server (who was most likely straight off the boat from Italy) tried to talk to me in broken English. He swore we received a gluten free pie. I literally had argue and show him that our pizza looked entirely different than the one next to us. End result: he went to ask the chef. Downfall for the server: the kitchen was three feet from our table and we could see the entire conversation play out. The two chefs, server and owner looked like they were huddling before going to war. Whispering, peering over their shoulders, looking at our tables - the whole nine.

My friend and I saw the entire thing unfold. We both assumed they'd come over and lie but to my surprise (and not a happy surprise) they admitted their mistake and apologized. Great. Satisfaction of being right didn't really make me excited on this one. Within about thirty seconds the owner walked over to also apologize, comped our entire bill and provided me with a $50 to return another time so they could get it right.

I was skeptical but also impressed. The most I expected was to receive a comp for the pizza, not the entire bill. I thanked the owner, left a tip (we really didn't know the protocol for something like this) and left. I grabbed the first cab I could find and hightailed it home. It didn't make much difference because I started feeling sick along the way. Lovely. The following two days were even more painful.

I waited a few months before returning. On my second visit we ate the bar. We ordered drinks and burrata. Yet again, they served me the same crappy gluten free bread. When ordering our gluten free pizza we were very clear that I had an allergy and even pointed to the gluten free section of the menu.

The pie came out and looked exactly the same as the table next to us on our previous trip. Great news! The crust was super thin and crispy and to our surprise tasted pretty good. We opted for the regular Margherita - covered in tomato sauce, homemade mozzarella pecorino romano, basil and olive oil. It tasted amazing!


I have to say, I was hesitant to return after my previous experience but let's be honest, this is New York City. If someone gives you $50 to eat at their restaurants that doesn't look like a dump, you take it! I'm glad I did. I was pretty angry after my first visit to Don Antonio's. After my second visit I know I will return. I know most people with Celiac would have completely boycotted any restaurant that made them sick - sure, my judgement could have failed me but thankfully it didn't. The burrata is so amazing, how could I have to pass that up. ;)

Friday, December 6, 2013

Gluten Free Roast Beef

Where's the beef!? That's not a question often asked in my kitchen. I tend to cook turkey, chicken or shrimp and rarely even purchase red meat. Sometimes, you just have a craving, or in my case, found a really great deal and popped a juicy roast in the freezer for a rainy day.

I'm sure I've shared this story before but in case not, my first meal I ever remember cooking was beef roast. Random, right? In high school my mom worked during the day (mid nights prior to that) and would call on her way home to have me start dinner. It was usually beef or pork roast. Super simple and in felt like a junior chef when then fork tender meat came out of the oven.

That feeling still hasn't changed. It's pretty darn amazing that you can put a large tough piece of meat in a slow cooker and a few hours later, voila, tender beef cooked to perfection!

Not the best photo but beef roasts are not the prettiest meal in my opinion.

Recipe:
1 tbsp olive oil
3 lb top or bottom round of beef
1/4 cup cornstarch
1 onion, diced
6 cloves garlic, minced
1 14.5 oz can of diced tomatoes
2 cups red wine
2 cups beef broth
1/2 tsp thyme
2 bay leaves
2 tsp salt
1/4 tsp black pepper
2 cups peeled, chopped root vegetables, such as potatoes, carrots, etc

Directions:
1) Coat the roast in olive oil then pat with cornstarch, salt and pepper. Heat a large skillet over medium-high heat and brown the roast, turning on to each side to ensure entire roast is browned.
2) Place beef round roast in slow cooker, then add carrots, onion, potatoes and any other desired vegetable. Add in garlic, wine, broth, thyme and bay leaves.  Cook on Low until the meat is tender, 6 to 8 hours.

Monday, December 2, 2013

Trader Joe's Gluten Free Polenta


Organic Polenta

I know I have mentioned before that I have an obsession with Trader Joe's. It's a pretty torrid love affair. I can't get enough of that place and their cute, unique foodie products. I really love cooking with new ingredients so that makes this affair even more complex.

Okay okay, enough about TJ's. Let's talk about my new find: polenta! Alright, so I know this isn't new, like at all, but it's new to me. I've only had it once, which was an amazing creamy polenta fricassee of truffleed mushroom dish from Scarpetta - life changing actually. But that was it. I didn't even know you could purchase a precooked tube of it for only $2! That was obviously a no brainer! But what to do with it? Well at first, I let it sit in my cupboard for 2 months. (Sorry, I failed you TJ's.) after dusting it off, it was magical. A perfect ingredient that can compliment almost any dish with the right flavor!


I kept it simple and sliced the polenta thin then pan fried each side with a little olive oil. I topped my polenta cakes with a bit of homemade sauce pasta sauce and Parmesan. Yum. So tasty! I'm already plotting out the next time I make it: I want to top with Mediterranean ingredients! I think feta, olives and red pepper with onion would taste amazing with the cakes. I'll keep you posted!

Xoxo Trader obsessed blogger
P.s. Hey TJs', start making more labeled gluten free products!

Saturday, November 30, 2013

Gluten Free Brownie Ice Cream Cake

Thanksgiving was an extra special holiday this year. It was also Bradley's birthday!! The big 21! (JK, he's much older than that!) ;)

We spent the day with Brad's family, me mostly in he kitchen. It's always a bit tricky cooking for a big group of people especially when I'm the only one with a food allergy. It worked out pretty seamlessly. We had turkey, potatoes, green beans and a few gluten filled dishes that I avoided. My meal was all delicious.

For dessert I whipped up a special treat for the birthday boy: gluten free ice cream cake! I prepared a box of gluten free brownie mix and once it cooled, I topped with a thick layer of slightly melted ice cream then popped it in the freezer for a bit. Before serving, I sprinkled some broken Butterfinger bars around the top as garnish. It was a bit hard to cut at first but chocolate brownies and vanilla ice cream are always perfect together!

Thursday, November 14, 2013

Gluten Free Chicken Cordon Blue Casserole


Earlier this week I whipped up another roasted chicken and used a large chunk of it on Saturday for  our pizza toppings but I still had plenty left over. Coincidentally, I've become a Pinterest addict and recalled pinning an interesting recipe for a chicken cordon blue casserole. Prior to my diagnosis I was in love with making Italian chicken cordon blue. It was delicious but I honestly can't remember the last time I had it. I figured there was no time like the present to give the casserole a whirl!

Recipe:
FOR THE CASSEROLE:
2 cups shredded roasted  chicken,
1/2 lb very thinly sliced gluten free deli-style ham, rough chopped
1/4 lb thinly sliced Swiss cheese 
FOR THE SAUCE:
4 tbsp butter
4 tbsp gluten free flour
3 1/4 cups whole milk
2 tbsp lemon juice
1 tbsp Dijon mustard
1 1/2 tsp salt
1/2 tsp smoked paprika
1/4 tsp white pepper
FOR THE TOPPING:
6 tbsp butter
1 1/2 cups gluten free bread crumbs
3/4 tsp salt
1 1/2 tsp crushed dried parsley
Directions:
1) Preheat oven to 350 F. Butter a 9- x 13-inch baking dish. Set aside.
2) Layer shredded chicken on the bottom of the baking dish. Scatter the ham over the top of the chicken. Lay the Swiss cheese on top of the ham.
For the sauce:
1) Melt the butter in a large sauce pot over medium heat. When butter is melted, quickly stir in the gluten free flour to form a smooth roux. Be careful not to let this brown! Once the roux is smooth and bubbly, slowly pour in the cold milk while stirring briskly to make a smooth sauce. 
2) Cook over medium heat, stirring constantly until the sauce thickens. Stir in the lemon juice, Dijon mustard, salt, smoked paprika and white pepper. Bring sauce just back to a low boil and turn off heat. Pour sauce evenly over the casserole, being sure to get some of the sauce around the edges of the pan.
For the topping:
1) Melt the butter in the microwave in a medium sized microwaveable bowl. Heat for 30 seconds at a time and stop once it’s melted. Take the bowl out of the microwave and stir in the gluten free bread crumbs, seasoning salt and crushed dried parsley. Sprinkle over the top of the casserole.
2) Bake casserole uncovered for 45 minutes until hot and bubbly throughout and topping has turned a light golden brown. Remove from oven and allow to cool for 5-10 minutes prior to serving.

This simple dish came together in just a few minutes. It smelled absolutely wonderful as it baked and tasted even better than the smell! It is definitely a great option for left over chicken. :)

Monday, November 11, 2013

Gluten Free Pizza Night!

Brad and I had such a relaxing weekend. Saturday, we lounged around the house watching TV and debating what yummy meal we wanted to make on Sunday, while a roasted chicken was cooking in the oven. The chicken smelled delicious and we couldn't wait to reuse it for another dish. After debating, we settled on PIZZA!! I've had a pack of Bob's Red Mill Gluten Free Pizza Dough mix. It was about time I used it.


We popped over to the grocery store to pick up some toppings and couldn't wait to get to cooking. We decided to head out during the day Sunday to watch some football so before we left I prepped the dough.

Recipe:
1 16 oz package of Bob's Red Mill Gluten Free Pizza Crust Mix (3 1/4 cups)
1 1/2 cups warm water
2 eggs
2 tbsp Olive Oil
1 yeast packet (enclosed in mix)

Directions: 

1) Preheat oven to 425°F.
2) In a large bowl, combine water and yeast. Let stand a few minutes. Add eggs and oil to mixture and blend briefly. Add GF Pizza Crust Mix and blend about a minute on medium speed, until combined.
3) Leave dough in bowl, split in half, cover with plastic wrap and allow to rise 20 minutes.
4) Place dough on greased pizza pans. Using wet hands, spread out dough to cover the full pizza pan. Bake without topping for 7-9 minutes.
5) Remove from oven, cover with favorite sauce and toppings. Bake for 15-18 minutes.

The dough kit makes two 12-inch or one- 16-inch pizza crusts. Dough can be stored in the refrigerator for a few days. Wrap dough in plastic wrap and store in plastic bag. When ready to bake, take dough out of refrigerator and allow to rest 30 minutes. Spread dough onto greased pizza pan and bake as directed.

I prepped the dough and tossed it in the fridge while we went out for the games. When we came back...it was pizza time!! While our chicken was roasting on Saturday, I tossed in a head of garlic for roasting. For my pie, I spread a thin layer of olive oil on the crust then smeared the roasted garlic, followed by loads of mozzarella, chicken a little more garlic and a balsamic glaze. It was absolutely amazing!! I loved every last bite. 

My roasted garlic chicken pizza
Brad opted for a more manly route and started with a thin schemer of tomato sauce, followed by mozzarella, chicken, cut up chorizo, red onion and a few dollops of BBQ sauce on top. I have to say, as much as I'm not a fan of BBQ pizza, I did enjoy a bite of his. 

Brad's chicken chorizo BBQ pizza.
We were both very pleased with the taste of the crust as well! If you hadn't told us it was gluten free, we wouldn't have known. It was just as great as any other home made dough. We both give Bob's Red Mill's dough an A+!!! We will definitely be buying it again. It's so much fun to play in the kitchen together, especially when the end results is pure deliciousness!

Tuesday, November 5, 2013

Avocado and Egg Salad

Some days I am just plain lazy. I don't feel like making dinner, therefore I don't have a lunch to bring to work the next day. That was the case today. I'm traveling later this week so I opted not to go to the grocery store. Thankfully, last week I snagged an avocado on my way home. I had every intention of making a really great salad but that never happened. Instead, it gave me the base for my lunch today.

While at my desk, I mashed the avocado together with the hardboiled eggs I brought in for breakfast (and never ate.) After they were fully mashed, I added a few dashes of salt and pepper. It tasted perfect! If I had lemon or lime juice I would have added that too but who keeps that at work? Not me! This will definitely become a new go-to recipe for me.


Tuesday, October 29, 2013

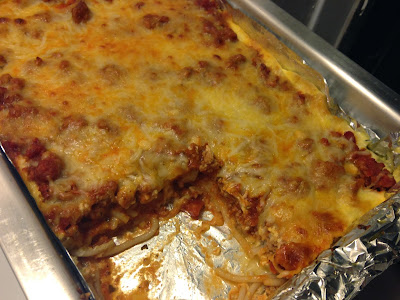
Baked Spaghetti Pie

I haven't had as much time in the kitchen as I would like lately so I've been making sure that if nothing else, I set aside Sunday night for new recipes. I was scanning Pinterest earlier this week and came across a baked spaghetti recipe and thought "why on earth would someone take an extra step to bake pasta after boiling it??" I had to find out for myself.

I was absolutely amazed and in love with this recipe. I wanted to capture the recipe step-by-step through photo so I could share because this was a whole new experience for me. Since I don't want to blow the big reveal, I'll start with the basics:

Ingredients for Recipe:
1 lb ground beef
1 jar 26 oz pasta sauce
8 oz gluten free spaghetti, cooked al dente
1/2 cup grated Parmesan
2 eggs
1 cup heavy cream
1 cup 2% milk
1/2 tsp garlic salt
1 1/2 cup shredded mozzarella cheese

Directions:
Step 1:  Pre-heat oven to 350 degrees. Line a deep 9x13 baking dish with foil then  lightly coat with nonstick cooking spray.
Step 2: Meanwhile, brown ground beef in skillet, stirring occasionally, breaking up the meat, until the meat is cooked through, 5-7 minutes. Remove the skillet from the heat and drain the excess grease. Add pasta sauce to meat and set aside (no need to heat sauce).

Step 2:
Step 3: Place cooked spaghetti in baking dish and sprinkle Parmesan evenly over the top.

Step 3:

Step 4: Next, In a small bowl whisk eggs and add cream, milk, garlic salt, to combine then pour egg mixture over the Parmesan and noodles.

Step 4:

Step 5: Pour meat sauce over the top and spread evenly.


Step 6:  Sprinkle layer of meat with Parmesan and mozzarella.

Step 6:

Step 7: Bake 45-50 minutes until cheese browns and sauce bubbles. Let sit for 10 minutes before serving.

Step 7:

There you have it! The most amazing spaghetti dish I've had in my life. Seriously, this was life changing. Now I completely understand why someone would take the time go through the extra steps to make pasta. Not only does it taste better but it makes serving pasta easier and it's covered in twice as much cheese!! This will definitely be one of my new faves.

Wednesday, October 23, 2013

Trader Joe's Blessing: Shredded Brussels Sprouts!

I've been on a Trader Joe's kick lately. I don't know how people can hate that place (yes, haters exist. Trust me.) Not only do they have delicious options but it's cheap too. I can get a massive bag of fruit, veggies and snacks for less than $20. Amazing!

Two of my favorite products lately are the gluten free coconut chips and shredded Brussels sprouts (not to be eaten together, of course). The coconut chips are a great snack when I'm on the run. I usually toss them into the TJ's raw cashew, almond and dried cranberry mix. So delicious.

Brussels spouts, on the other hand, are best enjoyed after a little sauteing.  I love sauteing half the bag of sprouts with a third of a bag of chopped kale and half a chopped onion. Once they're softened, I add a dash of lemon juice and season with salt, pepper and a little Parmesan and voila, an amazing side dish! I've gotten into such a habit of making these I tried two main-dish options that I love equally: kale and Brussels pizza and kale and Brussels with shrimp. They're both super delicious and easy to prepare

Kale, Brussels Sprouts and Onion pizza:
First, cook the kale, sprouts and onions as directed above, sans Parmesan. Take your favorite prepared gluten free pizza crust and spread a tablespoon of olive oil to cover. Next, sprinkle some freshly shaved Parmesan to your liking. Personally, I love a thick layer of cheese. Lastly, spread kale-Brussels mix evenly over the top and season with salt and pepper. Bake until crust is cooked through and cheese is melted.


Kale and Brussels Sprouts with Shrimp:
Prepare kale and Brussels as directed above. In a separate sauté pan, heat a tablespoon of butter over medium heat and toss in 8 to 10 shrimp. Cook for about two minutes on each side, until pink. Season with salt and pepper then toss over kale and Brussels.

Two amazing dishes sharing the same easy to prep ingredients. Yum!

Thursday, October 17, 2013

Restaurant Review: S'MAC

 The opportunity to write a restaurant review is very exciting for me.  And for obvious reasons...there aren't a ton of truly gluten free options out there. Sure, I can get a salad and burger without a bun almost anywhere but mac and cheese? That's rare.

But not at S'MAC, short for Sarita' Macaroni and Cheese. S'MAC caters to the gluten free but also offer options for the regular pasta eating folks. I had my first S'MAC taste several years before my diagnosis and loved it. I've been meaning to go back but just hadn't gotten around to it. Thankfully, S'MAC teamed up with Groupon and offered a great deal for two medium macs (also called major munch) and two drinks. It was destiny.

My boyfriend and I stopped by their Murray Hill location after work tonight. I couldn't make up my mind. Every menu option was available gluten free. From meaty cheeseburger mac to cajun or buffalo chicken. I was going to take a lighter caprese route but opted for the bacon and ordered their Apline instead: slab bacon covered in Gruyere. mmm mm

I have to say - it was absolutely amazing. Every cheesy bite was better than the one before. And the top was covered in the perfect layer of crispy crunchy cheese and served piping hot in an adorable cast iron skillet.

The major munch was so big that I had to take it to go in two containers which I can't even complain about because who wouldn't want delicious Mac two days in a row!? I definitely would have been satisfied with their "nosh" version aka small...but again: leftovers - amazing!!

I would give S'MAC a five star rating! Whether your gluten free or just love plain old Mac and cheese, this is the spot for you!

Wednesday, October 9, 2013

Broccoli, Scallion, Chickpea Pasta

Brad and I just got back from an amazing weekend with my nephews and family in Nashville. My little brother surprised us and he and his girlfriend decided to drive down for the weekend as well. We visited the Honky Tonks downtown, went to the Chiefs vs Titans game and had authentic BBQ (that made me sick... Yuck).

When we got home, exhausted after playing with the boys from sun up to sun down, the last thing we wanted to do was cook and I had nothing to work with. My hunger won and I threw together scallion, broccoli and chickpea pasta. With a little bit of salt, pepper and Parmesan, it was amazing. For 15 minutes work in the kitchen, I was a happy lady!

Recipe:
8oz gfree pasta
2 tbsp butter or oil
1/2 can chick pea, rinsed
2 cups frozen chopped broccoli, cooked
2-3 Scallions, chopped
Salt, pepper and Parmesan to taste.

Directions:
1) Cook pasta as directed on package, any shape noodle with do.
2) Heat broccoli until cooked all the way through then toss with chickpeas and scallions.
3) When pasta is finished cooking, toss with butter, broccoli, chickpeas and scallions then season with salt, pepper and Parmesan to taste.

It's really that easy and delicious! 

Wednesday, October 2, 2013

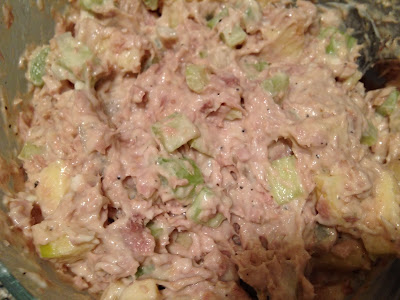
Tuna Salad

I've been craving tuna salad lately. It's an odd craving for me since it's not a dish that I eat very often but at least it's healthy, right? Earlier this summer while on vacation with Brad's family, I was introduced to the Ellis tuna salad special. In addition to celery and onions, they add apples to their salad. I was immediately intrigued.

Verdict: it was love at first bite!! The sweetness of the apples added an amazing taste and crunchiness to the salad. I'll probably never make this another way again.

Recipe:
2 cans of tuna, packed in water
1/2 onion, diced small
2 gala apples, diced into chunks
3 stalks of celery
1/2 - 3/4 cups mayo
1/8 tsp salt
1/4 tsp pepper

Directions:
Combine the ingredients in a large bowl. Use your best judgment when it comes to mayo. If the salad is a bit thick, you'll want to add the additional quarter cup of mayo. If you happen to add too much, toss in a few more apple or celery chunks to beef it up. ;)

Thursday, September 26, 2013

Baker's Corner Gluten Free Brownie Mix

I'm not big on posting product reviews but after giving it some thought  I realized that many of you out there may not have tried gluten free boxed cake or brownie mix. Then I realized that if i didn't post this, you may never eat brownies again. Just kidding... Cue dramatics.

So here it is: my product review of Baker's Corner Gluten Free Brownie Mix. My mom picked this mix up for me at Aldi in Michigan and carried it with her all the way to New York. (Don't worry, she drove. It's not like this took up space in her only suitcase on a flight or anything.) I'm fairly certain Baker's Corner is an off brand of Betty Crocker. I've seen their g-free mixes at the grocery store as well but have yet to give it a try.


Anyway, let's get on with this. The process of adding ingredients i.e. egg, water, and oil or butter is the same as any boxed mix. That goes for he baking as well. The one thing different is the taste. I opted to use oil since I always did with regular mixes but going forward I plan to use butter. The creamy, saltiness of the butter would have definitely improved this recipe. Don't get me wrong, they were nice and chocolaty and perhaps some wouldn't have noticed the difference, but I did. The mix needed that tiny kick of flavor that it was missing with oil.

Despite this flaw, I devoured majority of the brownies myself. Do I regret it? Nope!! I don't get the opportunity to enjoy tasty cakey treats anymore.  I will definitely use this mix again. It gets and A+ for convenience and A- for taste.

Friday, September 20, 2013

Broccoli Chicken Pasta


In my  post earlier this week I mentioned that I had a great recipe to use up the wonderful chicken I roasted. As you saw from my leftover suggestions, I tend to make a lot of soup with extra chicken on hand so this one had to be different. I scoured Pinterest high and low and saw a lot of great options. Some form of chicken Alfredo is what stuck out to me. Since learning of Celiac, I've steered clear of Alfredo sauces since you can never be too sure of what is added to the sauce. Tonight, I mastered my own delicious creamy cheesy masterpiece!

Recipe:
12 oz gluten free noodles,  used the thinnest noodle I could find and broke it into bits
1 stick unsalted butter
1/2 cup gluten free all purpose flour
1 teaspoon kosher salt
1/2 teaspoon freshly ground black pepper
2 1/2 cups chicken broth
1 1/2 cups shredded cheddar cheese
2 cups shredded cooked chicken breast
1 lb broccoli florets, steamed
1 1/4 cups milk

Directions:
1) Prepare noodles according to package directions, drain and set aside. You'll probably want to pour a little oil over top to ensure they don't stick together.
2) Melt butter into a medium saucepan over medium heat. Whisk in g-free flour, salt and pepper, whisking until thick and combined. Slowly whisk in chicken broth until combined. Increase heat to high and whisk until thick and bubbly. Reduce heat to low and stir in cheese until melted.
3) Transfer noodles to a large pot and turn burner on low heat. Add chicken, broccoli and cheese sauce, stirring to combine. The sauce will be thick. Stir in milk to loosen sauce to your liking. Serve and enjoy. 

Monday, September 16, 2013

Oven Roasted Chicken

Cooking a meal large enough to get me through a few lunches has become a pretty major priority for me. With later work meetings or events or planned workouts or happy hours (let's be honest... More happy hours than gym time..) I find myself with little time at home to cook for the week. Last fall, I was constantly making large batches of soup and it always worked out perfectly: food for days and freezer meals too!

I really needed to back into that habit and thankfully, my cube mate inspired me to do so. She came to work Monday bragging about the roasted chicken she made the night before. It sounded delish! And guess who bought two chickens from Costco a few weeks back? Me!

I took the tried and true simple herb roasted chicken route and it came out beautifully. I, personally, get sick of eating chicken by itself but you came make so many great soups from the leftovers. If you're looking for ideas,  take a look at a few of my old recipes below this one, or hang tight until tomorrow because I plan on making a chicken and broccoli pasta. Mmm mm.


Recipe:
3 to 4 pound chicken, neck removed, rinsed and patted dry
2 medium onions, quartered
5 to 6 cloves of garlic, pealed and smashed
2 tbsps of butter, sliced thin
A few sprigs of thyme
1/2 lemon
Salt and pepper

Directions:
1) Preheat oven to 350 degrees. Grease your favorite roasting pan and lay half of the onions on the bottom of the pan.
2) Stuff the cavity of the chicken with the remaining onions, lemon, thyme and garlic.
3) Set the chicken in pan, breast side up. Slip your hand between the skin and the breast meat and slide the slices of butter evenly underneath. This will melt and help to create that amazingly delicious crispy skin that we all love.
4) Lastly, season the top of the bird with salt and pepper and pop it in the oven. Bake uncovered for about an hour and 15 minutes. Check periodically to ensure skin is not burning, if so, cover with foil. Bake until the chicken reaches and internal temp of 180 degrees.

Chicken Leftover Ideas:
~ Chicken Minestrone Soup
~ Chicken and Rice Soup
~ Chicken and Barley Soup
~ Greek Chicken Quinoa

Wednesday, September 11, 2013

Gluten Free Veggie Pasta Sauce

It's half way through another week and I still have tomatoes leftover from my parents garden. Who knew my mom was being literal when she said she was bringing me a to!? The last thing I could possibly think to make of was sauce...and I can't really complain about that. ;)

I wasn't really in the mood for pasta so I served my fresh sauce over quinoa and topped it off with fresh mozzarella. It was delish! And as always, I made a pretty large batch of the sauce so I could save some for later. There's nothing better than defrosting homemade sauce instead opening a jar full of preservatives, don't you think?

Recipes:
2 24oz cans of crushed tomatoes
1 24oz can whole plum tomatoes
2 tbsp olive oil
1 cup cherry tomatoes, halved
1 red pepper, diced
1 onion, diced
4 cloves garlic, minced
1/4 tsp salt
1/2 tsp pepper
1 tsp dried Italian seasoning 

Directions:
1) Heat the olive oil over medium high heat and saute onions and red pepper until softened, about 4 minutes. Add tomatoes and garlic and stir for another minute to incorporate.
2) Carefully, add the can of whole plum tomatoes, hand squeezing each tomato into the pot to break them up a bit. (I always manage to squirt my entire kitchen during this process.) Next, add cans of crushed tomatoes, Italian seasoning, salt and pepper and bring pot to a boil. Reduce to a simmer and cook for 30 minutes.

Monday, September 9, 2013

Gluten Free Kale, Carrot and Corn Soup

After a few days on an Italian kick, I was ready to mix things up by making soup tonight. I obviously still have some tomatoes from Michigan as well as carrots and onions from the Tomato Veggie Casserole I made last week so this was a no brainer. What's even better than being able to use up leftover? Being able to enjoy them later....lots of soup for freezer meals. :)

Recipe:
1 tbsp olive oil
1 medium onion, diced
2 to 3 carrots, sliced
1 clove garlic, minced
1 cup frozen corn
1/2 zucchini, diced
1 cup cherry tomatoes, halved
1 can white beans, drained, not rinced
5 cups chicken Stock
1 tsp salt
1 tsp of your favorite herb blend
3 cups kale, chopped
Directions:
1) Heat olive oil over medium heat in a large soup pot. Add onion and cook until just beginning to turn translucent. Next, add carrots and garlic, cook for about 3 minutes or until carrots are just start  to soften.
2) Add corn, zucchini, tomatoes, beans, stock, salt and  herbs to pot, stir well to combine. Heat to a low boil. Stir kale into pot, be sure all leaves are covered in broth. Cook for 3 – 5 minutes and serve immediately.
3) Veggies will be al dente, cook longer if you prefer softer vegetables.

Saturday, September 7, 2013

Creamy Caprese Quinoa Bake

I STILL have tomatoes and mozzarella left over from when my parents were in town. To me, that's a blessing, not a problem! ;) I found this yummy recipe on Pinterest and new I would love it! ...and I was right! Brad and I ate off this for a few days and never complained a bit.

Recipe:
2 cups cooked quinoa
1 cup of your favorite pasta sauce
2 tbsps tomato paste
1/3 cup heavy cream
1/3 cup parmesan
1 cup mozzarella, divided
1/2-1 cup grape tomatoes, halved
1 large bunch fresh basil, cut into ribbons
1/2 tsp crushed red pepper
1/4 tsp salt
1/4 tsp pepper

Directions:
1) Preheat oven to 350 degrees F.
2) Heat tomato sauce and tomato paste over low heat in a large saucepan. Once warm, stir in heavy cream, parmesan, crushed red pepper, salt and pepper. Remove from the heat and stir in the quinoa.
3) Fold in half of the mozzarella and half of the tomatoes, then chop 6 fresh basil leaves and add them in too. Once combined, spray an 8x8 or 9x9 baking dish with non-stick spray and pour the entire quinoa mixture into the dish. Top with fresh mozzarella rounds or shredded mozzarella and the remaining tomatoes.
4) Bake for 10 to 15 minutes and then turn the broiler on and broil for 1 to 2 minutes or until cheese is golden and bubbly.
5) Remove from the oven and top with fresh basil ribbons. Give it a few minutes to cool then serve.

This is the dish just before topping with the mozzarella. I could eat this just as is, but who doesn't love more mozzarella!?

You should know: I did not have any heavy cream at home. At first, I was angry. Then I realized I could make my own heavy cream with butter and milk. Perfect! (so I thought...) To make heavy cream you have to combine 3/4 cup of milk with 1/3 cup butter. I microwaved my butter to ensure proper measurement then poured it into cold milk. All of you scientists out there know that if you add a hot ingredient into a cold ingredient it will separate. I basically had little butter caviar floating in my milk. OOPS! Thankfully, I knew that once warm again all would be right in the world. I popped my cup of milk and butter into the microwave for a few seconds and TADA... I had heavy cream.

Caviar butter! lol

Thursday, September 5, 2013

Caprese Pasta!

My parents always drive when they come to visit so I used that to my advantage this year: Costco trip! They told me in advance that they were bringing me a ton of tomatoes fresh from their garden. When they said "ton," they weren't joking. Between regular tomatoes and cherry tomatoes, I had about 6 pounds of tomatoes on my hands. I used a few in my previous Tomato Vegetable Casserole dish and gave a few away to friends, but that still left me with quite a few tomatoes to deal with. I'm a huge fan of mozzarella caprese so I picked up some fresh mozz when we we're at Costco.

Thank goodness I did!! On top of enjoying traditional caprese with my family, I made a pasta rendition of my favorite treat!

Recipe:
8 oz gluten free pasta - I went with tube shaped pasta
1 cup cherry tomatoes, halved
1 beefsteak tomato, cut into chunks
1 1/2 cups mozzarella, cut into cubes
1 bunch of basil, chopped
3 tbsps olive oil
2 tbsps balsamic glaze
salt and pepper to taste

Directions:
1) Cook pasta as directed on package.
2) Meanwhile, heat 1 tablespoon of oil over medium high heat and add tomatoes. Sautee until tender; about 4 to 5 minutes.
3) Turn heat off. Once pasta is complete, toss pasta into pan with tomatoes then add mozzarella and basil. Stir then add in oil and balsamic glaze. Season with salt and pepper.

That's it! Super easy and so delicious!

Monday, September 2, 2013

Tomato Vegetable Casserole

My parents were just in town for the weekend and requested that I cook at least one meal for them, since they LOVE my cooking . We had a fun filled weekend planned - from Long Island City to Hoboken, Staten Island Ferry to South Street Seaport. We literally walked everywhere. With that, eating at my place was a bit hard but I planned ahead and had a meal in mind for their first day in town. 

My good friend Hillery and her mom made a heavenly delicious tomato veggie casserole a few weeks back. It smelled soooo good, but unfortunately had real bread crumbs in it so I couldn't partake in the goodness. I knew it'd be easy to make this g-free so that's what I had planned for my family. It was a fan favorite for sure! My parents have been trying to make healthier choices so this was the perfect meal for them. :)

 Recipe:
2 medium potatoes, peeled and cut into 1/2-inch pieces
1 red bell pepper, seeded and cut into 1/2-inch pieces
2 carrots, peeled and cut into 1/2-inch pieces
5 tbsps olive oil
1 red onion, thinly sliced into rings
2 small or 1 large zucchini, cut crosswise into 1/4-inch-thick pieces
Salt and pepper
2 large ripe tomatoes, cut crosswise into 1/4-inch thick slices
1/2 cup grated Parmesan
2 tbsp gluten free Italian-style bread crumbs

Directions:
1) Preheat the oven to 400 degrees F.
2) Toss the potatoes, bell pepper, carrots, and 2 tablespoons of olive oil in a 9x13  baking dish to coat. Sprinkle with salt and pepper and toss until coated. Spread vegetables evenly over the bottom of the pan.
3) Arrange the onion slices evenly over the vegetable mixture. Arrange the zucchini over the onion. Drizzle with 2 tablespoons of oil. Sprinkle with salt and pepper. Arrange the tomato slices over the zucchini.
4) Stir the Parmesan and bread crumbs in a small bowl to blend. Sprinkle the Parmesan bread crumbs over the vegetables in the baking dish. Drizzle with the last tablespoon of olive oil.
5) Bake uncovered until the vegetables are tender, and the topping is golden brown, about 40 minutes. Be sure to prick the potatoes to ensure they're tender. I had to cook for about 50 minutes to reach desired tenderness.

This meal was a wonderful blend of veggies with a perfect blend of tomatoey-cheesy Italian goodness!

My plated dish. :)

Thursday, August 29, 2013

Mozzarella Stuffed Chicken Meatballs


 After an amazingly relaxing vacation, I couldn't wait to get back to cooking this week. While I was in Canada we ate very well, but there is something about preparing a meal in my own home that makes me so happy. And when it comes to home cooking, Italian food is where it's at for me.

Until now, I haven't attempted a gluten free version of meatballs but have been craving them so much. I enjoyed some great chicken meatballs at The Meatball shop and was inspired to try my own version, stuffed with mozzarella. This recipe turned out great! My boyfriend and I absolutely loved them! I served them over my favorite homemade sauce that I had stored in the freezer.

Recipe:
1 cup gluten free breadcrumbs
1 small onion, finely chopped
1 garlic clove, minced
1 large egg, lightly beaten
1 lb ground chicken
2 tbsp tomato paste
1 tbsp dried parsley
1 tbsp extra-virgin olive oil
4 to 5 oz fresh mozzarella, cut into 1/2 inch cubes.
Sauce of your choice

Directions:
1) Preheat oven to 400 F with a rack in the upper third of the oven.
2) In a skillet and set over medium heat add the onion, garlic and 1/2 teaspoon each of salt and pepper and cook until the onion has softened, about 6 minutes. Remove the onion and garlic to the plate and allow to cool slightly.
3) In a medium sized bowl, add breadcrumbs, egg, chicken, 1 tablespoon of tomato paste and the parsley. Use your hands to gently combine the ingredients.
4) Form the mixture into 12 meatballs. Poke a hole in the middle and stuff with mozzarella then cover with meat. Set in a 9x13 baking dish.
4) Stir together the remaining tablespoons of tomato paste and the oil then brush over meatballs (the paste/oil won't combine in any cohesive manner, just do the best you can).
5) Bake in the upper third of the oven for 20-25 minutes, or until the meatballs are cooked through.
6) Serve over your favorite sauce and enjoy!

How AMAZING does that look!?

Tuesday, August 13, 2013

Shrimp and Mushroom Pasta in White Wine Sauce

If you've followed me for more than a week you'd know I LOVE making new pasta dishes. Last night was no exception. Tomorrow I'll be traveling for work for two days, then going on vacation for over a week. So much to do, so little time. Although I was in a time crunch to pack and prepare for my trips, I was able to enjoy a delicious meal...with wine in it no less!! OBVIOUSLY I had to finish the entire bottle. I couldn't let it go to waste while I was away. ;)

Recipe:
8 oz gluten free spaghetti noodles
14 to 16 shrimp, deveined and tails removed 
1 cup mushrooms, diced
1/2 cup tomatoes, halved
1/2 cup white wine
2 tbsp butter
2 cloves garlic, minced
1/4 cup Parmesan
salt and pepper to taste

Directions:
1) Cook noodles as directed on package. Reserved 1/2 cup of cooking water in case your sauce is a bit thick; you can use the reserved water to thin it out as desired.
2)  In a skillet over medium heat, melt one tablespoon of butter then add shrimp. Cook shrimp for about 2 minutes on each side, until pink. Once cooked, move shrimp to the edge of the pan. Add the garlic, mushrooms and tomatoes and cook until softened, about 3 to 5 minutes. Once softened, stir shrimp back into the mix and add wine and last tablespoon of butter. Cook until wine has reduced by about half then stir in parmesan and turn off heat.
3) Toss in cooked pasta and season with salt and pepper to taste. If your sauce does not fully cover, this would be the time to add a little bit of the reserved cooking water from the pasta. I always add more parmesan at this point too! ;)

Enjoy!


Friday, August 9, 2013

Healthier Chocolate Cupcakes

Several months back...okay, maybe more than a year ago... I made cupcakes for a co-workers birthday. Since cupcakes use to kind of be my thanggg on this blog AND it was my first time baking at ACS I had to make sure I tried out a fantastic new recipe. I saw so many recipes on Pinterest that suggested substituting oil for greek yogurt or applesauce so I decided to start with the latter of the two.

Disclaimer: I did this pre-Celiac so I am not sure how this will turn out with a gluten free boxed cake mix, but I can say that it worked like a charm for regular Duncan Hines chocolate mix. You simply replace all other ingredients listed on the box with one cup of sugar free applesauce. That's it! It may sound like it wouldn't bake right, but trust me, it did. They were delicious!

In addition to the twist on the cake recipe, I really wanted to try out the new (at the time) Dunkan Hines Flavor Creations frosting. I decided to go with hazelnut since I thought it would compliment the chocolate and applesauce in the cake. I followed the mixing instructions on the packets and I have to tell you... it was awful!!! Like, I wouldn't feed it to my worst enemy, awful! The frosting was so overly sweet it hurt my teeth. I had no time to start a new batch from scratch so I worked my magic by adding cream cheese to offset the sweetness and a little milk to thin it out a bit. It still wasn't quite right so I also added some cocoa powder and a little bit of confectioners sugar. After a few minutes of mixing and tweaking, I had a decent frosting that I was comfortable sharing with colleagues. Word to the wise: don't waste your time on Frosting Creations. You'll be far better off spending a few extra minutes making your frosting from scratch.

When all was said and done, I had a great story to tell about my experiments in the kitchen and some delicious cupcakes to share at work! They looked fab, don't you think?


Tuesday, August 6, 2013

Homemade Pizza Night!

Who doesn't love pizza? Especially, grabbing a slice after a long night of dancing with friends...yea, that doesn't happen anymore but it certainly does during movie night at home! :) I should have known my trusty friends at Udy's would have the perfect frozen crust! Thankfully, I got my hands on a two-pack so tonight, we set out to make the perfect pie.

My favorite pizza to make is a white pie with garlic and oil as a base but tonight I wanted to mix it up. I had some left over Yolonda Pesto from last week so I slathered that on below a thick layer of shredded mozz, a few diced onions, diced red pepper, cherry tomatoes and pepperoni!

It was deeee-licious! The perfect blend of salty and sweet. And the crust was great! If I didn't know I was eating a gluten free crust, I would have just assumed it was any ordinary thing crust, which is a HUGE compliment for those of you that don't know how hard that is to come by in the gluten free world. I'll definitely be buying Udy's crusts again.


Thursday, August 1, 2013

Gluten Free Shimp and White Bean Pesto

No matter how hard I try, I always reach a point where I am completely out of groceries. I don't mean that I have like 3 things in the fridge, I mean absolutely nothing except condiments. I've hit some pretty major lows in my life, but never low enough to suffer through a few squirts of cetchup as a meal. Thankfully, I rarely let my freezer or pantry run dry and tonight, that was my savior.

After a long day at work I was able to scan my kitchen and whip up gluten free pasta with shrimp, white beans and pesto! And not just any pesto -  locally made pesto from Yolanda Pesto. I believe Yolanda Pesto it is a one woman show, which is incredible and on top of that, it's the best pesto I've ever had. Every bite tastes like you just made it from freshly cut basil. MMm mm! I could put this on everything, and I probably will but for tonight, check out this recipe!

Recipe:
8 oz gfree pasta
1/4 to 1/2 cup reserved cooking water from pasta
8 to 10 shrimp, cleaned and tails removed
1 tbsp olive oil
1/2 can white beans
1/3 cup of Yolanda Pesto, or other pesto of your choice
salt and pepper to taste

Directions:
1) Cook pasta as directed on package. Be sure to reserve the cooking water for later.
2) Heat oil in a sautee pan over medium-high heat. Toss in shrimp and cook until pink, about two minutes on each side. Just as shrimp is finishing, toss in white beans to slightly heat.
3) Turn off the heat then add the pesto and 1/4 cup of reserved cooking water. Stir until combined. If pesto is still chunky and not fully covering the pasta, add a little bit of the reserved water until desired consistency. Season with salt and pepper.

I will say, the color of this dish is pretty bland looking but the flavor is amazing!

Wednesday, July 31, 2013

Gluten Free Pancakes!

When it comes to breakfast on the weekends I tend to stick with a large cup of coffee and maybe a little fruit. But every once and a while I get a craving for something more, something soft and fluffy covered in melted butter and gooey syrup: pancakes!!!

Growing up, my mom ALWAYS made us french toast...literally, the BEST french toast on the planet. We'd have it for breakfast on the weekends and every once and a while for dessert (Yes, french toast for dessert. Try it. You won't be disappointed.) In any case, french toast was so prevalent that having pancakes for breakfast was a treat. Naturally, this treat was removed from my diet with the onset of Celiac but all that changed last weekend.

I was up and at it extra early and veryyyy hungry. I've had Bob's Red Mill g-free all purpose baking flour in my Cabinet so it was time to put it to use again. In the process of cooking I realized I was out of syrup so I sent my boyfriend running to the store because what are pancakes without sweet yummy syrup! End result: peer bliss!!!

 Recipe:
1 1/3 cups gfree all purpose baking flour
1 tsp baking powder
1/2 tsp baking soda
1/2 tsp salt
2 eggs
1/2 cup milk
2 tbsp extra virgin olive oil

Directions:
1) Combine the flour, baking powder, baking soda and salt in a bowl. In a separate bowl, whisk together the eggs, milk and oil. With the whisk, stir wet ingredients into dry ingredients until smooth.
2) Heat a large skillet over medium high heat. Spoon about 1/3 cup pancake batter onto pan. Flip when bubbly and edges are slightly dry.
3) Cover in butter and gfree maple syrup, as desired (of course.)

Tuesday, July 23, 2013

Mac and Cheese!!!

Aside from buttered noodles covered in parm,  one of my fave dishes B.C. (before celiac) was Mac and cheese. MMMM mmmm!! I loved me some stringy, gooey, cheesy macaroni! It didn't take me long to find my go-to noodle substitute so I'm really not sure why it has taken me this long to make some again. The good news: I haven't lost my mac & cheese making touch! This dish might have been my best Mac ever. In addition to boatloads of cheese, I added sausage and pepperoni to give the meal some substance. Man, was it good!! Enough talking - get in the kitchen and make this!!


Recipe:
8 oz gluten free elbow noodles
10 slices of small pepperoni, I used the ones for topping pizzas
2 sausage links, casings removed 
1 cup Velveeta cheese, cubed
1/3 cup shredded cheese, I used a nacho blend but anything works great
2 oz cream cheese
dash of milk

Directions:
1) Cook pasta according to package.
2) While pasta is cooking, heat frying pan over medium high heat and cook sausage, breaking it into little bits. One almost fully cooked, toss in pepperoni to heat it through. 
3) Once pasta is complete, drain and rinse then place back in the saucepan it was cooked in. Toss in Velveeta and cream cheese, mixing until fully melted. If the cheese is too thick, add a dash of milk to loosen a bit. Add shredded cheese and meat then stir until fully combined. Season with salt and pepper if desired.

Friday, July 12, 2013

Bistango - Gluten Free Italian Restaurant Review

Dinning out these days is always a gamble. I've discovered that no matter how detailed I am when explaining Celiac Disease to a waiter, they never quite understand. More often than not, I end up not feeling well after my meal. As a result, I've done my best to cut back on eating out but lets be serious... living in New York, it's unavoidable. It's also one of the greatest things about this city- any kind of food you want at any hour. Is amazing!! 

Thanks to some research by my boyfriend, I've found one of my new go-to spots: Bistango! It's located in Murray Hill, not too far from my office. The restaurant offers regular and gluten free fare. Before even ordering drinks (Green's g-free beer is what we went with), the waiter asked if either of us had any food allergies. It was very happy because I knew I was in good hands. On top of being thrilled that I'd be able to enjoy some of my Italian favorites, the service and attention to detail by the server was great.  

That evening, my boyfriend and I ordered Bistango's amazing burrata mozzarella with prosciutto and roasted red pepper. It was so creamy and delicious and went great with the g-free bread and garlic olive oil they served. For our main courses, we both ordered different g-free pasta dishes so I had a chance to try a few options. I order the short-rib bolognese (obvii) and Brad ordered sausage and pepper with spinach. Both of them were out of this world!! I, of course, topped mine with tons of fresh parm so it was even better. ;)

I honestly didn't think things could get any better, then the dessert menu came. Almost all of their desserts are g-free. I pretty much squealed and I read RED VELVET CAKE!!! Yes, I said it... gluten free red velvet!! It was soooooooo moist and delicious. I literally inhaled it. Poor Brad barely got three bites. 

We've been back several times since and have always enjoyed our meal. I give you my word that this will be one of your favorite gluten free spots too!

Burrata Mozzarella with Prosciutto and Roasted Red Peppers

G-Free Bread with Garlic Olive Oil

G-Free Penne with Short-Rib Bolognese

G-Free Red Velvet Cake!

Green's G-Free Beer

Monday, July 8, 2013

Quinoa with Red Peper and Onion

Since this summer has been sweltering hot cooking at my apartment (with no AC) has been out of the question! Thankfully, my lovely boyfriend has central air so I've spent a very large chunk of my time over there. :) One thing that an apartment shared by three guys lacks is proper kitchen gear so many nights I do my best to whip up something easy.

Tonight was no problem at all! A few nights ago, I made our FAVORITE salad so I had left over red peppers and onions. I tossed those in a pan with some oil and cooked until they were tender. Meanwhile, I boiled quinoa, which has a two to one water ratio. Once finished, I tossed the peppers and onions in with the quinoa then topped it with some salt, black pepper and Parmesan. Boom! That's one fast meal.


Thursday, June 27, 2013

Tuscan Turkey Chili

Although a hearty bowl of chili is crowd favorite in colder months, once in a while I just get a craving that I can shack, regardless of the season. This week, I wanted something strong in protein with veggies but really wanted to avoid my normal go-to starch of choice: pasta a la meat sauce. After a few (or many) minutes surfing pinterest, chili came to mind. My mouth was immediately watering!

It's pretty much the perfect meal: heavy on meat and beans and has a great blend of veggies. Plus, you really don't need to have it with anything else. To lighten the dish a bit and keep bikini ready, I took a tuscan twist rather than your average beef and kidney bean flavor. It was delish!

Recipe:
1 tablespoon olive Oil
2 onion, chopped
2 bell pepper, chopped
4 cloves garlic, minced
1 pound ground turkey
1 can tomato paste, 6 oz. 

1/4 cup chili powder 
2 teaspoon cumin 
2 15 oz cans white beans

1 15 oz can diced tomatoes
2 1/2 tsp salt
1/2 tsp pepper

Directions:
1) Heat oil in a large skillet over medium heat and cook onions, peppers, and garlic and cook until soft.
2) Add turkey and cook until browned.  Add Tomato paste, chili powder, and cumin and cook, stirring for 2 min. Finally, add beans, tomatoes and their juices,  salt and pepper.  Simmer until thickened, 20 min.

Tuesday, June 18, 2013

Martha Stewart's One Pot Pasta!

If you've been on Pinterest anytime in the last few months you've probably seen this recipe. I mean, come on... A full homemade pasta dish in one pan? You can't be serious. I was dying to try it but had my concerns with how it would turn out with gluten free corn noodles. I figured "what's the worst that can happen?"  It's sad to say this but I was thoroughly disappointed. I completely forgot how starchy corn noodles are. Now that I'm always cooking g-free I rinse my noodles in scalding hot water after cooking. This recipe does not allow for that.

When I was finished, I ended up with a gel-like, starchy, tomato-y substance. Gross! I promise to try this again after doing some research on the best g-free option. In the meantime, I would encourage you to try with regular wheat noodles! I can't imagine Martha would steer general public wrong.


Recipe:

12 oz linguine pasta
1 15oz can of diced tomatoes with liquid
1 large sweet onion, cut in julienne strips
4 cloves garlic, thinly sliced
2 tsp dried oregano leaves
2 large sprigs basil, chopped
4 1/2 cups vegetable broth
2 tbsp extra virgin olive oil
Parmesan cheese for garnish

Directions: 
1) Place pasta, tomatoes, onion, garlic, basil, in a large stock pot. Pour in vegetable broth. Sprinkle on top the pepper flakes and oregano. Drizzle top with oil.
2) Cover pot and bring to a boil. Reduce to a low simmer and keep covered and cook for about 10 minutes, stirring every 2 minutes or so. Cook until almost all liquid has evaporated.
3) Season to taste with salt and pepper , stirring pasta several times to distribute the liquid in the bottom of the pot. Serve garnished with parmesan cheese.

Despite my messy outcome, I loved putting this meal together. It came together so beautifully that took step-by-step pics. (Well, beautifully until the end.) 


The final product - a sad mess!